 [ Thinking in B&W ] - [ Getting Started ] - [ Taking Pictures in B&W ] - [ Developing B&W ] - [ Printing B&W ] - [ The Negative ]
Paper Negatives
There are two ways of using paper negatives. One is effectively a modern version of Fox Talbot’s 1841 “Calotype” process, in which photographic paper is exposed directly in a large-format camera. The paper is processed to give a negative, and a final positive print is obtained by contact printing.
Paper negatives can also be used as a means of retouching. In the past, when photographers used glass plates as big as many of today’s prints, retouching involved pencilling on the surface of the negative itself, to remove blemishes. Nowadays, most negatives are so small that this is no longer practical. However, it is still possible to retouch a paper negative, which you can make by contact printing an ordinary print on a paper such as ILFORD MULTIGRADE IV RC DeLuxe. After retouching the paper negative, you contact print it to make the finished positive print.
Remember: you must make the initial print and the intermediate paper negative the exact size that you want the final print; you cannot enlarge paper negatives.
The initial positive print should be soft in contrast and fully exposed, so there is plenty of highlight detail. Unless you photographed the original subject in very flat lighting, you’ll get optimum results by making the initial print with MULTIGRADE filter 0 or 1.
You make the paper negative by sandwiching the original positive print, emulsion-to-emulsion, with a fresh sheet of paper, and pressing them tightly together under a sheet of heavy glass. You then expose the “sandwich” to the light of the enlarger, just as if you were making a contact sheet from a roll of film negatives.
ILFORD MULTIGRADE IV RC DeLuxe is particularly suitable for making paper negatives because, unlike many papers, it is not marked on the reverse with the manufacturer’s name. In addition, its resin coating hides the fibrous nature of the paper. Uniform areas of light tone such as sky may still show a little unevenness, but not the strong mottling effect that is apparent if you use a fibre based paper.
Retouching the image is simply a matter of adding density to the back of the print, using a soft pencil such as a 4B, a grease pencil, or charcoal. Because the marks are on the back of the paper, they are not clearly visible on the contact print.
It is best to do retouching in two stages: add density to the initial positive print in the areas where you want the final print to be darker; darken the back of the intermediate negative to lighten the final print.
To see where retouching is necessary, place the paper negative face down on a light-box, or hold it up against a window. You can check the process of retouching from time to time by making a contact print from it. You have not altered the original negative; so if you go too far, you can always make another positive print and start over again.
The following article and images are reproduced with the permission of ANDREW SANDERSON
Photographer, master printer, author and tutor
All images Copyright Andrew Sanderson
The paper negative process substitutes the normal film-based negative with one made on photographic printing paper.
For many years photographers have used paper in pinhole cameras because of the ease of loading and processing (The drop in technical quality is not usually deemed important with pinhole images).
Paper can also be exposed in conventional manual cameras of many differing sizes and formats.
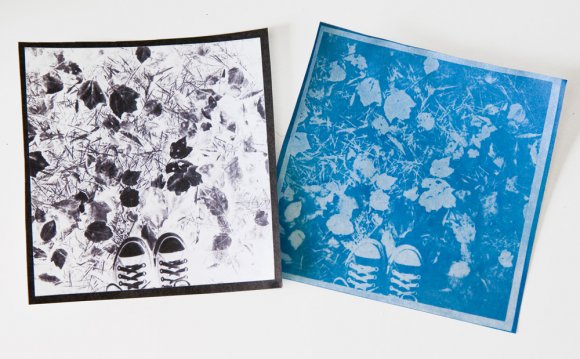
Usually, a piece of photographic paper is exposed in the camera to produce a negative, which is developed by inspection under safelight and is then printed by contact or projection. This produces images with a unique quality, mainly because of the differing contrast and texture, and also from the unique tonal representation, which is down to its blue/green sensitivity.
The texture it imparts to the final image - some papers offering more texture than others -is a very interesting aspect of the process.
This is the basic form of paper negative work. A more advanced and interesting method involves tonal manipulation by the addition of pencil to the back of the negative (and, with some papers, to the front also). The process affords great control and produces a unique look.
With a bit of practice the technique opens a magical world of possibility and can be used for a wide range of styles, from contemporary images through to those reminiscent of the impressionistic photographs of pictorialism.
When producing a print from a paper negative, some thought about the size of the negative and the finished print is necessary to determine the desired degree of texture showing in the finished print.
Small formats are obviously no good as contact prints and are better suited to enlarging, but they do give a much more exaggerated texture - fine if you want a more impressionistic result.
A 35mm negative will produce a print with exaggerated texture, even on a small enlargement. Whereas a 5x4 size negative will produce something much more subtle and contact prints can be presented as finished images
Larger formats make retouching and pencil work relatively easy, but need a corresponding sized enlarger.
Medium format is a good compromise: most enlargers are able to take it. For a print size of 10x8 inches, l prefer a negative around 6x9cm. A camera of this format needn’t be an expensive addition to your photographic toolbox.
Whatever negative format you prefer to use, in practice, the maximum negative size permitted by your enlarger may be the deciding factor.
There is no special trick to making prints from paper negatives, other than the fact that exposure times will be longer than with normal density film (roughly four times the exposure). Just make test strips in the normal way to determine the correct exposure.
I have produced a small self published book on the subject for those who wish to explore further;
Paper negative website; www.papernegative.com
My Website; www.andrewsanderson.com
My Blog; www.thewebdarkroom.com
ANDREW SANDERSON
Photographer, master printer, author and tutor
One of the UK’s leading Photographers and a master printer, Andrew has written the definitive book on Night Photography: A Practical Manual; the highly acclaimed Home Photography: Inspiration on Your Doorstep and; is a regular contributor to photographic magazines in the U.K.
He is an ILFORD Master Printer, and regularly gives workshops to university tutors, students and private individuals.
Andrew is recognised as the leading practitioner of the paper negative process and one of the world’s best hand colourists. Examples of both of these techniques can be found in his third book; Hand Colouring and Alternative Darkroom Processes.
YOU MIGHT ALSO LIKE


Share this Post
latest post
-
-
-
 History of advertising Photography October 10, 2016
 -
 Materials for pinhole camera October 7, 2016
 -
 Photojournalism photographers October 4, 2016
 -
 35mm nitrate film October 1, 2016
 -
 Photographic films September 28, 2016
 -
 One Colour Photographs September 25, 2016
 -
 Best compact digital camera for street photography September 22, 2016