| Cleanroom Home All Equipment |
Navigation Menu
|
Expand All
Compress All
- Equipment Specifications
- Light Source: 350 W Mercury Bulb
- Objective Lens: 5x, 10x, 20x
- Monitor: Hitachi split, left or right screen, left and right focus, grab image button, brightness adjustment
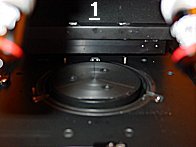
- Joystick Control: Continuous step or single step down to 1 micron, mask and/or microscope adjustment
- Adjustment: XY and theta
- Printing Methods: Proximity, Soft Contact, and Hard Contact (with 4 inch chuck), Vacuum Contact (with 4 inch chuck)
- Emergency off feature
- Gas Operation
- Open the nitrogen, compressed air, and vacuum valves at the rear of the machine.
- The valves are open when they are parallel to the pipes and off when they are perpendicular to the pipes.
- Lamp Operation
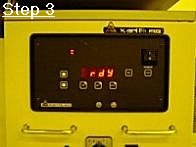
- Press Green Button that reads CIC Power Restart.
- Flip the Power switch.
- Wait for LED screen to say "rdy."
- Press the Start button and the LED screen will read "COLD".
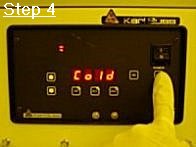 It will take between 10-20 minutes for the lamp to be ready for use and the LED screen will read "274" or "275" when ready. It will take between 10-20 minutes for the lamp to be ready for use and the LED screen will read "274" or "275" when ready.
- Machine Boot-Up
- Flip master switch to 1 position. (Computer turns on.)
- Press login button on touch screen and enter your username and password. (If your password is entered incorrectly the touch screen will switch back to the login screen and will be locked. You can press Ctrl + Alt + Del to restart the machine.) **To obtain a username and password you must be certified on the machine by Joe Bussio.**
- The machine will take a minute to boot up before you can begin to set up the Short Program.
- Lithography
- Long Program (To be used when processing multiple wafers)
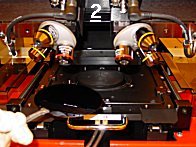
- Place boat into position on aligner.
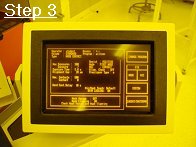
- See the picture:
- After the start button is pressed, the machine will proceed to automatically load a wafer onto the wafer chuck for processing. The wafer is aligned and the machine loads another wafer onto a temporary storage unit for faster processing of the wafers. Also, the microscope is lowered into place for aligning. The machine assumes that the mask you are using is not the first mask.
- The microscope will then raise and the expose button will light up.
- Now press the exposure button on the machine. The wafer will be exposed to light and unloaded to the ma150's specially-made boat. Congratulations! You have just completed your first wafer.
- Now press the Logout/Shutdown button (on the touch screen).
- If the Logout button is chosen, it will bring up the Login screen again. This is good if someone wants to use the machine right after you.
- If the Shutdown button is chosen, wait until the message appears saying it is ok to shutdown the computer. (Only shut down the machine if it will not be used for the next 3 hours.)
|


 History of advertising Photography October 10, 2016
 Materials for pinhole camera October 7, 2016
 Photojournalism photographers October 4, 2016
 35mm nitrate film October 1, 2016
 Photographic films September 28, 2016
 One Colour Photographs September 25, 2016
 Best compact digital camera for street photography September 22, 2016