What You’re Going to Need
Gear is at the heart of photography and can be really exciting, but typically it’s the aspect that most people become confused about.
There’s no necessity to spend a large portion of your budget on high-tech equipment, so keep an open mind and try not to overspend on gadgets that do the same job lighting your product as a $5 piece of card can do. You can probably do this window light setup for $20 or less if you already own a camera.
You’re only going to need a few things for this setup:
1. Camera
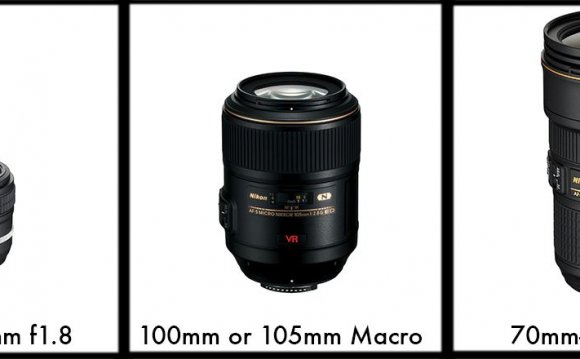
You don’t need a crazy camera system. While shooting images with a Nikon D800 ($2796) sporting a 105mm f1.4 lens ($740) is awesome, it’s also totally unnecessary.
Still, if you’re feeling excited, and have the budget to stretch to a new camera system for this project, I suggest reading a post I wrote on quora which offers tips to help you pick out a good camera for product photography.
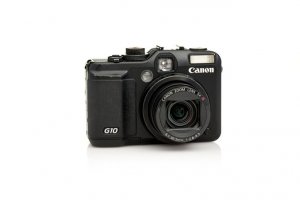
When I did the test images for this, I started with my older model (2008), beat-to-hell Canon G10 point-and-shoot. I love the Canon G series point-and-shoots because they can go full manual and they shoot a really nice raw file. I picked this camera because it’s definitely not top of the line anymore, allowing me to demonstrate that even with modest equipment, good results are attainable.
So what camera do you need? I would just start out with whatever you have handy and see what the results are. It’s a common myth that it’s the camera that takes the pictures, but in reality the camera is only one piece of the whole. A photograph is made up of series of choices that incorporates lighting, exposure, styling and post processing decisions.
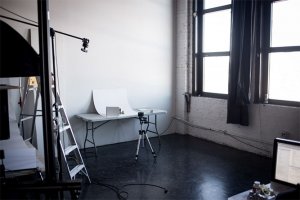
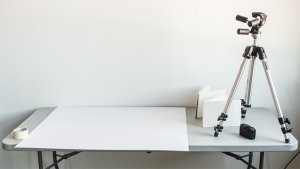
2. Tripod
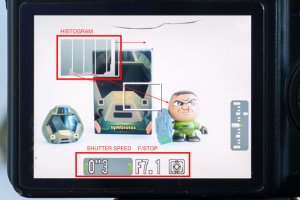
Not to get too technical, but you’re going to set your camera to a very small aperture so that you can have the most depth of field your camera is capable of.
The width of the depth of field defines the area of sharp focus, and to get to that you need the largest f/stop number your camera can obtain. Shutter speed and f/stop are related, and since a larger f/stop number like f/8 lets in less light, you’ll need to counter than by using a slower shutter speed to allow more light through.
When a camera has a slow shutter, you can’t hand hold it or the subject will be blurry – so a tripod is your answer. If you’re interested in learning more about the fundamentals of photography, check out this video I did with Harrington College of Design last year.
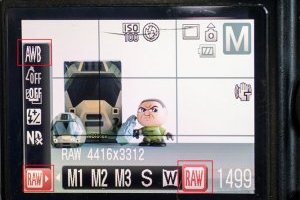
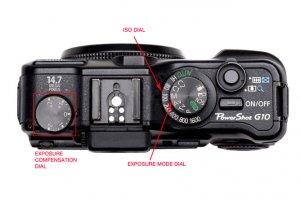
 I realize that most point-and-shoots may not allow you to choose your f/stop. That’s ok and there are ways to get around this which we’ll discuss in the step-by-step.
Again, you shouldn’t need to spend a whole lot of money on a tripod at this point in your adventure, and there are many, many options out there that are under $30. I did a quick search on Amazon and found something that would work for $20.
3. White Background
There are lots of options for a white background and if you’re going to be shooting a lot, you may want to go to your local photography store and get a small white sweep.
If you’re not in an area with a good photography store, you can always head over to your frame shop/art store and get a 32x40 sheet of their thinnest white Mat Board, which is what we’re using in this example.
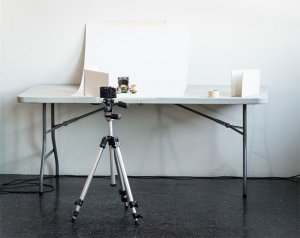 Look for something that you can bend a little bit to create a sweep. You can usually get this for under $7. Remember to look for pure white as off-white or cream, while cool, will be more difficult to make pure white.
4. White Bounce Cards Made of Foamcore
While you’re at the art store/frame shop, ask them if they have any extra scraps of white foamcore you can buy. You only need a piece roughly the height of your product, and about 3x the width. Typically, a letter size will work. We like to bend ours in half, like in the above example, so that it will stand up on its own. Its purpose is to bounce light back onto the product.
5. Table
A standard folding table works best, and a width that’s between 24 and 27 inch wide is ideal.
6. Tape
Depending on the table you end up with, you can use tape or clamps to secure down your board so that it sweeps properly.
7. The Right Room
A room with windows next to a wall is perfect, and the bigger the window, the more light you’ll get in.
YOU MIGHT ALSO LIKE

Share this Post
latest post
-
-
-
 History of advertising Photography October 10, 2016
 -
 Materials for pinhole camera October 7, 2016
 -
 Photojournalism photographers October 4, 2016
 -
 35mm nitrate film October 1, 2016
 -
 Photographic films September 28, 2016
 -
 One Colour Photographs September 25, 2016
 -
 Best compact digital camera for street photography September 22, 2016